Run Very Large Language Models on Your Computer
With PyTorch and Hugging Face’s device_map
New large language models are publicly released almost every month. They are getting better and larger.
You may assume that these models can only be run on big clusters or in the cloud.
Fortunately, this is not the case. Recent versions of PyTorch propose several mechanisms that make the use of large language models relatively easy on a standard computer and without much engineering, thanks to the Hugging Face Accelerate package.
In this article, I will present a simple way to use large language models on your own computer or a free instance of Google Colab, using Hugging Face Transformers and Accelerate packages.
For the purpose of this article, I’ll work with the 6.7B version of the OPT model released by META AI. If you have enough space available on your hard disk, you can try an even bigger version.
Requirements and environment
If you want to reproduce my experiments on your own computer, I recommend creating a conda (Anaconda) environment using Python 3.9.
The following command creates an environment named “device_map” and activates it.
conda create -n device_map python=3.9
conda activate device_map
Then, install the following package. Note that it may also work with higher or lower versions of CUDA.
conda install pytorch pytorch-cuda=11.6 -c pytorch -c nvidia
conda install -c conda-forge transformers
conda install -c conda-forge accelerate
As for the hardware, I could get a 6.7 billion parameter model to run on my nVidia RTX3060 12 Gb, with 16 GB of CPU RAM.
Out of memory
As I mentioned above, I will use the OPT-6.7B from the Hugging Face hub.
Let’s say that my objective is to use this model to make an application that generates language.
The standard way to load and use a model with Transformers could be implemented like this (as proposed by the Transformers documentation):
from transformers import GPT2Tokenizer, OPTForCausalLM

#Load the model
model = OPTForCausalLM.from_pretrained("facebook/opt-6.7b")

#Load the tokenizer
tokenizer = GPT2Tokenizer.from_pretrained("facebook/opt-6.7b")

prompt = "Hey, are you consciours? Can you talk to me?"
inputs = tokenizer(prompt, return_tensors="pt")

# Generate
generate_ids = model.generate(inputs.input_ids, max_length=30)
tokenizer.batch_decode(generate_ids, skip_special_tokens=True, clean_up_tokenization_spaces=False)[0]
When you run this code, it will first download the model (unless you previously used it), which is split into two parts 9.96 GB and 3.36 GB. So you should at least spare 20 GB on your hard drive just to host the model.
Then, it will load the model in memory… and crash.
While the model on your hard drive has a size of 13.4 GB (9.96+3.36), it needs to be expanded and fully loaded in your CPU RAM to be used. Since the model has 6.7B parameters, and that 1 parameter costs 4 bytes of memory, the model will require 4*6700000=26.8 GB of CPU RAM.
PyTorch first creates the model in memory and then loads another copy to get the model’s weights, so actually, you need twice more memory: 53.6 GB.
Consumer hardware configurations with that much CPU RAM are still very rare.
My computer and a Google Colab free instance don’t have so much RAM and consequently kill the process before it finishes.
Model splitting
To be able to run the model, we need to split it: Some parts of the model will be on the GPU VRAM, on the CPU RAM, and on the hard disk.
We can achieve this split very easily with Accelerate.
Let’s have a look at how splitting works with the following code:
from accelerate import infer_auto_device_map, init_empty_weights
from transformers import AutoConfig, AutoModelForCausalLM

config = AutoConfig.from_pretrained("facebook/opt-6.7b")

with init_empty_weights():
  model = AutoModelForCausalLM.from_config(config)

device_map = infer_auto_device_map(model)
Here “infer_auto_device_map” will infer the optimal split of the model to load as much as possible of the model on the GPU VRAM, then on the CPU RAM, and finally on the hard disk.
For instance, I obtained this split:
{'model.decoder.embed_tokens': 0, 'model.decoder.embed_positions': 0,
'model.decoder.final_layer_norm': 0,
'model.decoder.layers.0': 0, 'model.decoder.layers.1': 0,
'model.decoder.layers.2': 0, 'model.decoder.layers.3': 0,
'model.decoder.layers.4': 0, 'model.decoder.layers.5': 0,
'model.decoder.layers.6': 0, 'model.decoder.layers.7.self_attn': 0,
'model.decoder.layers.7.activation_fn': 0,
'model.decoder.layers.7.self_attn_layer_norm': 0,
'model.decoder.layers.7.fc1': 0, 'model.decoder.layers.7.fc2': 'cpu',
'model.decoder.layers.7.final_layer_norm': 'cpu',
'model.decoder.layers.8': 'cpu', 'model.decoder.layers.9': 'cpu',
'model.decoder.layers.10': 'cpu', 'model.decoder.layers.11': 'cpu',
'model.decoder.layers.12': 'cpu', 'model.decoder.layers.13': 'cpu',
'model.decoder.layers.14': 'cpu',
'model.decoder.layers.15.self_attn.k_proj': 'cpu',
'model.decoder.layers.15.self_attn.v_proj': 'disk',
'model.decoder.layers.15.self_attn.q_proj': 'disk',
'model.decoder.layers.15.self_attn.out_proj': 'disk',
'model.decoder.layers.15.activation_fn': 'disk',
'model.decoder.layers.15.self_attn_layer_norm': 'disk',
'model.decoder.layers.15.fc1': 'disk', 'model.decoder.layers.15.fc2': 'disk',
'model.decoder.layers.15.final_layer_norm': 'disk',
'model.decoder.layers.16': 'disk', 'model.decoder.layers.17': 'disk',
'model.decoder.layers.18': 'disk', 'model.decoder.layers.19': 'disk',
'model.decoder.layers.20': 'disk', 'model.decoder.layers.21': 'disk',
'model.decoder.layers.22': 'disk', 'model.decoder.layers.23': 'disk',
'model.decoder.layers.24': 'disk', 'model.decoder.layers.25': 'disk',
'model.decoder.layers.26': 'disk', 'model.decoder.layers.27': 'disk',
'model.decoder.layers.28': 'disk', 'model.decoder.layers.29': 'disk',
'model.decoder.layers.30': 'disk', 'model.decoder.layers.31': 'disk',
'lm_head': 'disk'}
You can see that the split is not done at the layer level and that components of the same layer may be on different devices. For instance, for layer 7, the self-attention layer norm is on the GPU, but the final layer norm is on the CPU RAM.
This is not optimal since it may break connections inside a layer. We need to indicate that layers shouldn’t be split. We can do this by adding one more argument as follows:
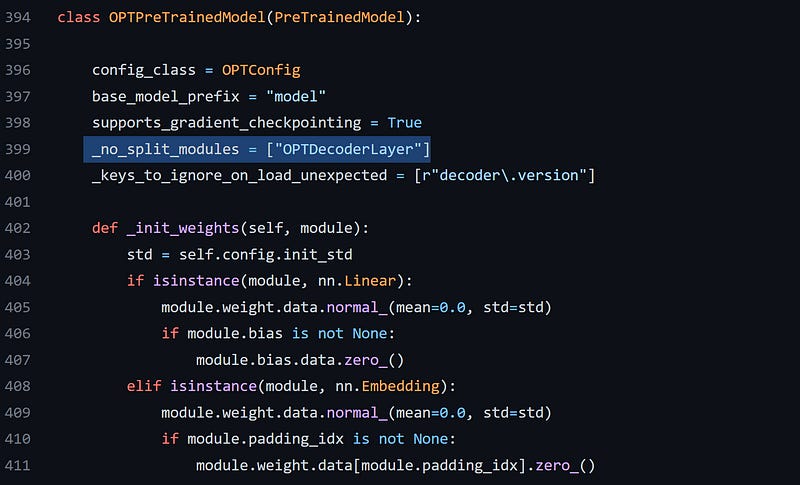
device_map = infer_auto_device_map(model,no_split_module_classes=["OPTDecoderLayer"])“no_split_module_classes” refers to the “_no_split_modules” variable that should be implemented by the model. For instance, for OPT, if you look at the source code, you will find it there:

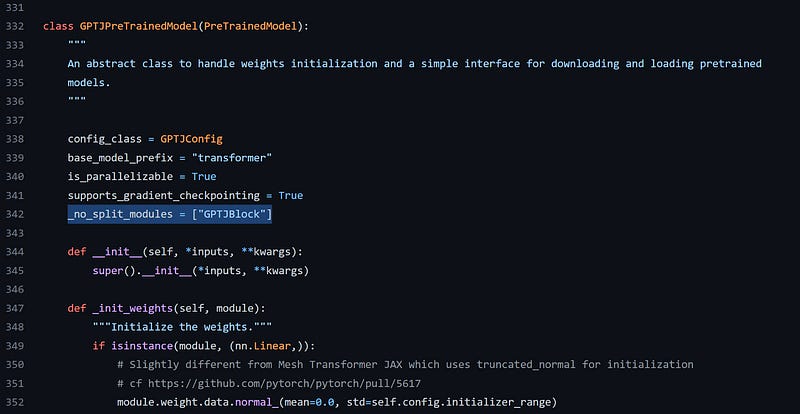
The name of the module varies from one model to another. For instance, for GPT-J-6B, it is called “GPTJBlock”:

The new mapping keeps each layer on the same device:
{'model.decoder.embed_tokens': 0, 'model.decoder.embed_positions': 0,
'model.decoder.final_layer_norm': 0, 'model.decoder.layers.0': 0,
'model.decoder.layers.1': 0, 'model.decoder.layers.2': 0,
'model.decoder.layers.3': 0, 'model.decoder.layers.4': 0,
'model.decoder.layers.5': 0, 'model.decoder.layers.6': 0,
'model.decoder.layers.7': 'cpu', 'model.decoder.layers.8': 'cpu',
'model.decoder.layers.9': 'cpu', 'model.decoder.layers.10': 'cpu',
'model.decoder.layers.11': 'cpu', 'model.decoder.layers.12': 'cpu',
'model.decoder.layers.13': 'cpu', 'model.decoder.layers.14': 'disk',
'model.decoder.layers.15': 'disk', 'model.decoder.layers.16': 'disk',
'model.decoder.layers.17': 'disk', 'model.decoder.layers.18': 'disk',
'model.decoder.layers.19': 'disk', 'model.decoder.layers.20': 'disk',
'model.decoder.layers.21': 'disk', 'model.decoder.layers.22': 'disk',
'model.decoder.layers.23': 'disk', 'model.decoder.layers.24': 'disk',
'model.decoder.layers.25': 'disk', 'model.decoder.layers.26': 'disk',
'model.decoder.layers.27': 'disk', 'model.decoder.layers.28': 'disk',
'model.decoder.layers.29': 'disk', 'model.decoder.layers.30': 'disk',
'model.decoder.layers.31': 'disk', 'lm_head': 'disk'}
You can manipulate this map as you wish. For instance, since Accelerate will try to maximize the use of the CPU RAM before going to the hard disk, it is possible that your system’s OS may not have any more CPU RAM available for itself.
If that happens, you can offload one more layer to the disk by modifying the values of “device_map” as follows:
device_map["model.decoder.layers.13"] = "disk"Wrapping up
Finally, to exploit this split, we only need to provide the “device_map” argument when loading the model, and to be precise with “offload_folder,” a folder where the layers will be stored on the hard disk:
model = OPTForCausalLM.from_pretrained("facebook/opt-6.7b", device_map="auto", offload_folder="offload")I set the device_map to “auto”, but you can also replace “auto” with a custom map created with “infer_auto_device_map,” which you may modify.
The code will run, but of course, since some parts of the model are on the hard disk, it may be slow.
The space available on your hard disk is the only limit here. If you have more space and patience, you can try the same with larger models.
I wrote another article about device map that you can find here:


Hi Benjamin,
Do we know how the inference computation is performed with a device map spread over VRAM/RAM/disk? Is everything being transferred to the GPU for computation or do we have inference performed on CPU for layers with parameters on RAM/disk? Thanks!